
Lotus Cove player guide
A practical manual for the commands and server features players use most, based on the current Lotus Cove plugin setup.
Getting started & travelling
Leave spawn with a random teleport, save your base, and use player teleport requests when meeting friends.
World travel
/spawnReturn to the top of the tree stump at spawn./rtpStart a five-second teleport to a random safe place in the survival world. Moving cancels it; the cooldown is five minutes./warpsOpen the menu of warps available to you./backReturn to your previous saved location when your rank includes it.
Player teleports
/tpa <player>Ask to teleport to another player./tpahere <player>Ask another player to teleport to you./tpyesor/tpacceptAccept the most recent teleport request.
Homes
/sethome <name>Save your current location./home <name>Teleport to a saved home./delhome <name>Remove a home you no longer need.
base, mine and shop so they are easy to remember.
Everyday tools
These shortcuts unlock gradually through the free voting ladder and supporter ranks. The ranks page shows exactly where each perk begins.
Inventory utilities
/trashor/disposeOpen a disposal container. Anything left inside is deleted./menuOpen the server’s main quick-access menu./compactor/condenseTurn reversible materials into storage blocks./skullReceive your player head.
Portable workstations
/craft/wb/workbenchOpen a crafting table./ec/ender/enderchestOpen your ender chest./stonecutterOpen a stonecutter./loomOpen a loom./cartographytableOpen a cartography table./grindstoneOpen a grindstone./smithingtableOpen a smithing table.
Personal appearance
/nick <nickname>Change your display name when unlocked. Hex colours such as𞉀and legacy colours such as&1are supported./ptime <time|reset>Change only the time that you see./pweather <storm|sun|reset>Change only the weather that you see.
Using Lands
Claim your base before building seriously. Lands protects your chunks from unwanted building, container access and other interactions. Claims are available in the survival world and Nether, and rank progression increases your land and chunk limits.
/lands edit <land> selects a land. Use /land <command> for that selected land./lands <command> [land] directly targets a named land, such as /lands spawn <land>.Shortcut:
/l is short for /land, so use /l <command> for your selected land.
-
Create a land.
Stand in the first chunk you want to protect, then run
/lands create <name>. Your new land starts with that chunk claimed at no cost. -
Check your borders.
Run
/lands mapfor a nearby claim map, or/lands viewto show your borders with particles. -
Expand when needed.
Stand in the next chunk and run
/lands claim. For a larger rectangle, use/lands selection, click two opposite corners, then run/lands claim. -
Manage it.
Open
/lands menufor members, roles, areas and settings. Use the Spawn option there to set a return point.
Useful claim commands
/lands mapShow nearby claimed and unclaimed chunks./lands viewShow claim borders with particles./lands infoSee information about the land at your location./lands unclaimRelease the chunk you are standing in.
Land home
/lands setspawnSet your selected land’s spawn point./lands spawnTeleport to your selected land’s spawn./lands edit <land>Choose which land later commands apply to when you own more than one.
Trusting players and managing roles
/lands trust <player> [area]Trust someone in one area, or omit the area for the whole land./lands untrust <player> [area]Remove access from one area, or omit the area for the whole land.- PlayersTrust or untrust members from the menu.
- RolesControl what each role may build, use or interact with.
- Promote or demoteOpen a player entry, then shift-left-click to promote or shift-right-click to demote.
Changing permissions and settings
- If you own more than one land, run
/lands edit <land>first so you change the correct one. - Run
/lands menuand open Roles. - Select the role you want to change, such as Visitor, Member or a custom role.
- Open its settings and click a permission icon to switch it on or off. The icon and its description show the current state.
- Use the back button to review the role before closing the menu; changes apply immediately.
- For a sub-area, open Areas, choose the area, then change that area’s roles or flags instead of the whole land.
Creating a three-dimensional sub-area
A sub-area is a block-by-block region inside a land. It can have its own trusted players and flags, which is useful for shops, shared farms or private rooms.
- Open
/lands menu, choose Areas, then choose Add area. - Enter the new area name in chat and follow the selection prompt.
- Select the two corners and adjust the live outline until it covers the right volume.
- Run
/land area <area> resizeto apply the selection to the new area. - Return to the Areas menu to set trusted players and flags for that area.
/lands view before expanding a build.
Climbing the Tower
The Tower is Lotus Cove’s homemade solo-or-duo minigame. Fight through ten themed stages of ten floors, defeat a named Guardian at the end of each stage, and decide how far you are willing to risk your equipment for better rewards.
- Prepare. Bring combat gear you can afford to risk, food, arrows and supplies. mcMMO abilities work, but Tower combat does not award mcMMO XP.
- Enter. Travel to
/warp towerand use the lobby portal, or run/tower join. Command entry asks you to confirm the risk by running it again within 15 seconds. - Clear floors. Defeat each encounter and take the stairs onward. Floors can include normal battles, survival or ambush waves, elite enemies and special rooms.
- Choose at each Guardian. After every tenth floor, select a blessing. Take the left staircase or use
/tower continueto climb; take the right portal or use/tower evacuateto leave safely. - Collect rewards. Use
/tower claimor right-click the rewards barrel in the lobby. Make inventory space and reopen it if more stacks remain.
Playing as a duo
- The leader runs
/tower party invite <player>. - The invited player runs
/tower party accept. - Both players run
/tower party readyto confirm that their inventories are at risk. - The leader enters with
/tower joinor the lobby portal.
Friendly fire is off. Revive a downed teammate by sneaking within three blocks for three seconds, and revive them before advancing. Both players must choose a blessing before continuing. Tower parties are separate from mcMMO parties.
Blessings and special rooms
Guardian checkpoints offer three blessings. Swiftness, Might, Ward, Vitality, Fireward and Poisonward last for the run and can stack to level three. You may also keep your current setup.
Special rooms include parkour and protection challenges, merchants with supplies, a smith who improves eligible equipment, rest rooms that repair gear, and risk rooms that trade a harder fight for bonus rewards.
Useful commands
/tower statusCheck availability and the active floor./tower statsView your progress, combat and reward statistics./profileor/towerprofileOpen your Tower profile menu./tower leaderboard <1-10> [duo]View the fastest times for a ten-floor stage./tower spectateWatch the active run without interacting./tower leaveLeave spectating, the queue or a run. Ending a duo run requires both players to confirm.
Safety and recovery
An inactive run pauses after 90 seconds. Move within the three-minute grace period to resume; otherwise the Tower restores your original equipment and forfeits that run’s rewards. After a server restart, disconnected runners have five minutes to return.
If another run is active, joining places you in the queue. You can spectate while waiting.
Money, shop plots & QuickShop
Admin carts around spawn exchange one diamond for $10 in either direction. Standard shop plots cost $50 for seven days, while smaller minishops cost $20 for seven days.
Renting a plot
- Choose an available standard shop or minishop and find its rental sign.
- Interact with the sign and confirm the seven-day rental.
- Build and stock your shop inside the rented region.
- Empty the plot before the rental expires.
/shops opens the shop-plot menu for players with a current rental.
Creating a chest shop
- Place a chest and hold the item you want the shop to trade.
- Click the chest with that item to begin QuickShop creation, or look at it and run
/qs create <price>. - Enter the requested price and choose whether the shop buys or sells.
- Stock the chest and test the sign before advertising it.
Voting & ranks
Voting supports the server and unlocks the permanent Acorn-to-Grove progression. Vote points are cumulative and are not spent when you rank up.
/voteOpen the current voting links./vote nextSee when each voting site is available again./vote pointsCheck your current vote points./rankupUnlock the next rank after reaching its threshold./voteupgradeOpen the Vote Shop anvil and combine an eligible item with an upgrade voucher./utilityvoucherChoose an item when you have an Unbreakable Utility voucher.
Community quests
Community quests let the whole server work together or compete toward a shared objective.
/cq viewView the active quests./cq donateOpen the donation menu for a collection quest./cq rewardsClaim rewards after a completed quest.
Quest announcements show the objective, time remaining and whether the goal is cooperative or competitive.
mcMMO
mcMMO adds RPG-style skills from the moment you join. Mining, fishing, gathering and combat build experience in their related skills and can unlock bonuses such as double drops, rare drops and stronger abilities.
Track progress
/mcstatsView all your skill levels./mcrankCompare your skill rankings./mining/fishing/woodcuttingView one skill’s level and bonuses. Other skills use their own name in the same way.
Power level
Your power level is the total of all mcMMO skill levels. It does not grant a separate bonus; it is a simple measure of your overall progression.
For detailed skill mechanics, use the official mcMMO wiki.
Collecting Silk Touch spawners
Spawner blocks can be collected with any pickaxe tier, starting with a wooden pickaxe, as long as it has Silk Touch.
Beacon rework
Beacons have a larger circular range: 16, 32, 48 or 64 blocks for pyramid levels one through four. Copper ingots may be used as payment, and copper or waxed copper blocks may be used in a beacon base.
Material strength
- Copper, iron, gold or emeraldUse normal vanilla effect strength.
- Diamond or netheriteGive level-II beacon effects.
Effect sharing
Nearby tamed pets and the mob you are riding can receive the selected beacon effects too.
Invisible item frames & armour stands
Invisible item frames
/itf toggle visibilityLook at one item frame and switch it between visible and invisible./itf togglemode visibilityEnable toggle mode, then right-click several frames to change them quickly.- When finishedRun the toggle-mode command again so ordinary right-clicks behave normally.
Starting the armour-stand editor
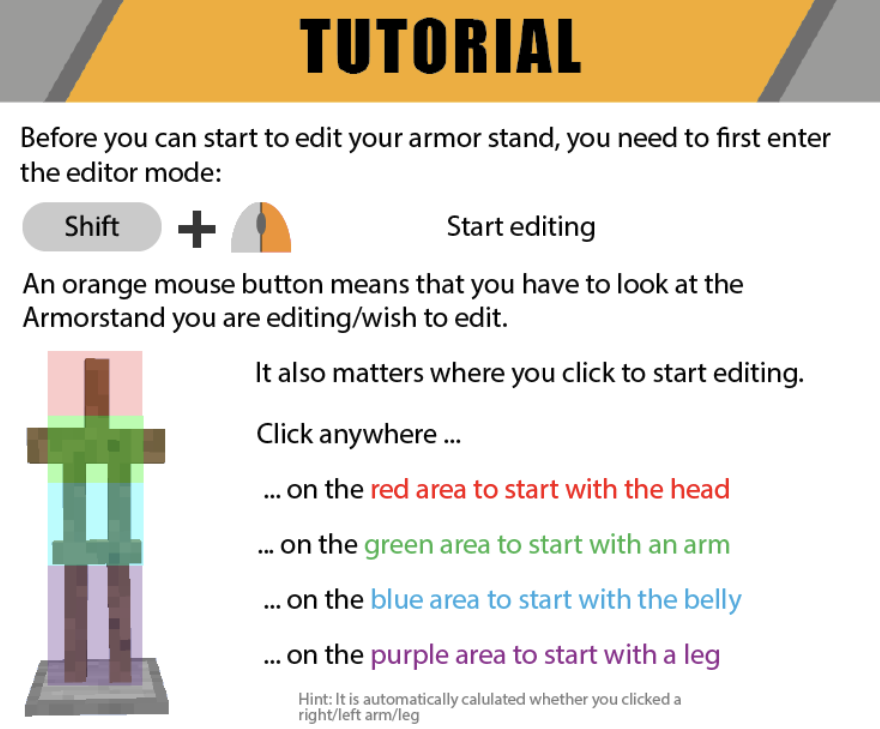
Hold Shift and right-click the armour stand. Where you click chooses the first body part: head, arm, body or leg.
Editing controls
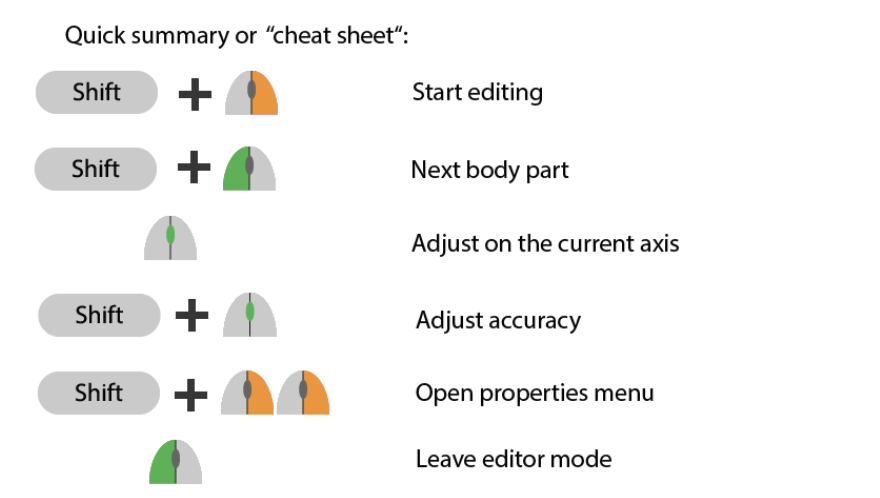
- Choose a part. Shift and left-click to cycle through body parts, position and rotation.
- Adjust it. Scroll the hotbar to change the selected value. Looking east or west changes X, north or south changes Z, and looking up or down changes Y.
- Change precision. Hold Shift while scrolling to move between adjustment sizes from very fine to large.
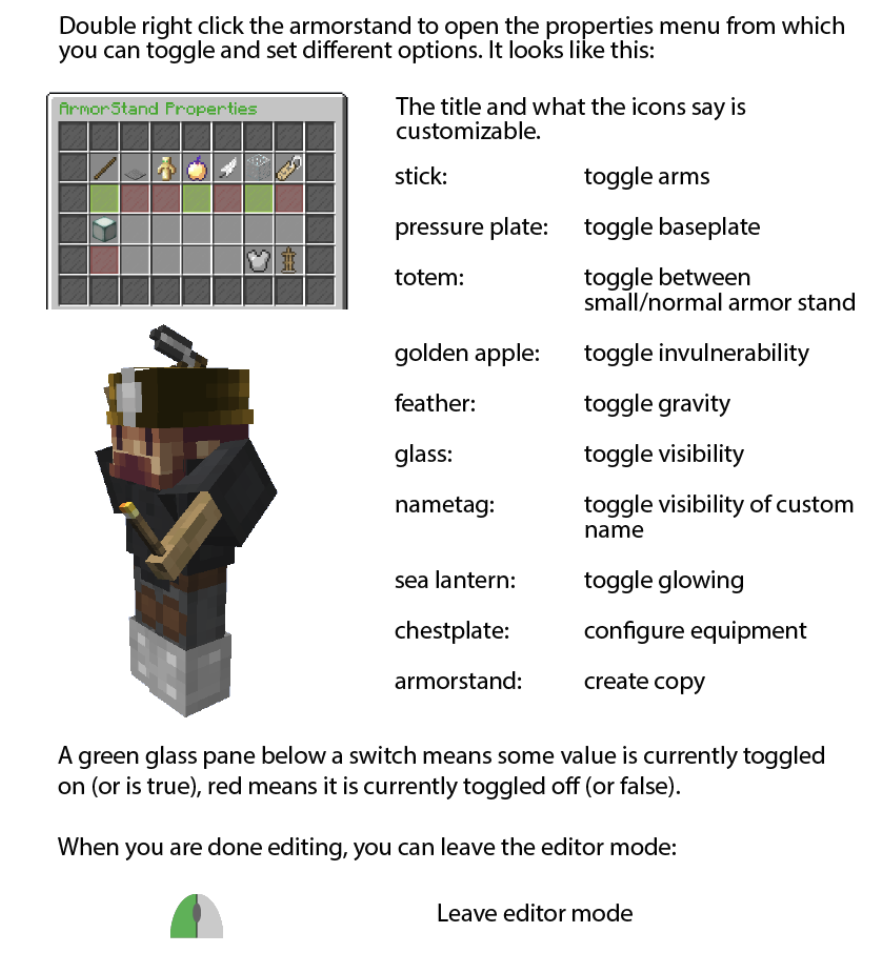
- Open properties. Shift and double-right-click to open the properties menu.
- Finish. Left-click to leave editor mode.
Still unsure?
Ask around or ask a member of staff in game or on Discord.
Poses & MarriageMaster
These features unlock through the voting and supporter rank ladders.
Poses
/sitSit on the block beneath you./crawlToggle crawling mode./spinSpin in place./layLie on your back./bellyflopLie on your front.Marriage
/marry <player>Send a marriage request./marry listList married players./marry chatSend a private partner message; addtoggleto keep the channel active./marry definehome/marry home/marry delhomeManage a shared home./marry pvpon/marry pvpoffControl PvP between partners./marry hug/marry kiss/marry divorce <player>Use partner actions or end a marriage.